
Setting up your first custom flight simulator is a fun and rewarding project that brings the thrill of flying right into your home. I have spent time exploring various setups to create an experience that feels as real as possible. This article provides detailed guidance on configuring your computer, selecting peripherals, and customizing the environment. I will also answer common questions to help you build an efficient and immersive simulator setup.
Essential Equipment for Your Custom Flight Simulator
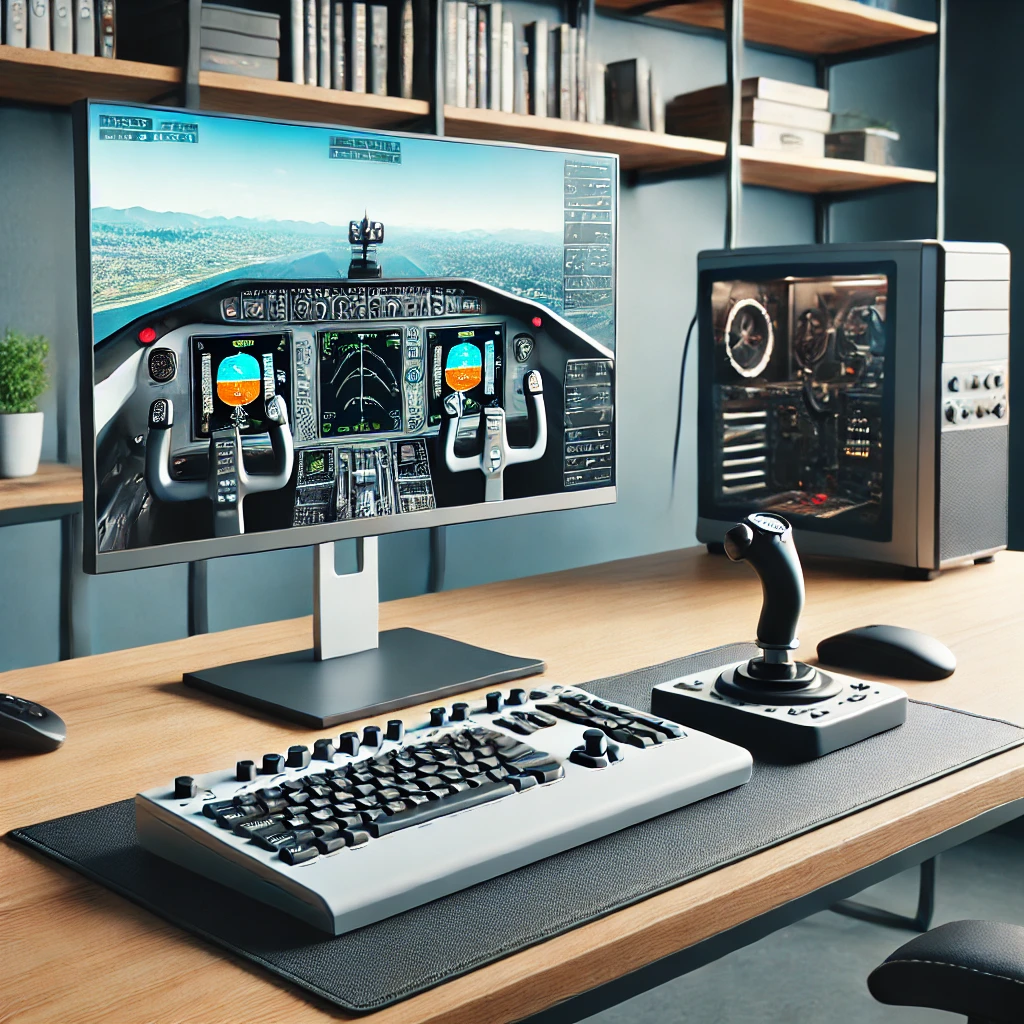
The first step in creating a life-like flight simulator is choosing the right equipment. Getting a setup that meets your needs can make a big difference in your overall experience. I recommend starting with a strong computer that can handle high-end graphics and simulation processing.
Look for a computer with a multi-core processor, plenty of RAM, and a solid graphics card to handle the demands of modern simulators. A monitor or even multiple screens can add to the immersion, depending on your budget and space. You also need a stable internet connection when running online simulation programs like Microsoft Flight Simulator.
Investing in quality peripherals is also very important. A sturdy joystick or flight stick, throttle controls, and rudder pedals can transform your interaction with the simulator. For additional realism, some enthusiasts choose to incorporate a set of speakers or even a VR headset. Putting all these pieces together creates a much more immersive and enjoyable simulation experience — one that really elevates your setup. For high-quality yokes and throttle quadrants, Honeycomb Aeronautical is a popular and trusted brand among simulation enthusiasts.
Getting Started with Custom Flight Simulator Setup
Before assembling your custom flight simulator, you must understand what equipment you need. A basic setup might include a computer, a monitor, and one or two simulation peripherals. The building blocks of your simulator include:
- Computer Hardware: A PC with specifications that meet or exceed the demands of modern flight simulators.
- Display Options: One large monitor or multiple screens to create a broader view of the cockpit.
- Control Interfaces: Flight sticks, throttles, and rudder pedals. These devices help simulate real cockpit controls and give you better control over the simulation.
- Audio Equipment: Speakers or a headset that can reproduce high-quality sound, adding another layer of realism.
- Optional Accessories: VR headsets and additional panels for extra simulation inputs can ramp up your experience.
This basic outline helps you decide on the essential components that your setup requires. Understanding what you need is the first step in building a system that suits your training or hobby goals.
👉 If you’re unsure where to begin, start with this flight simulation beginner’s guide.
What Do I Need to Set Up a Flight Simulator at Home?
If you are new to flight simulation, you might wonder what exactly you need to set up a simulator at home. I have found that a home-based simulation setup should include a high-performance computer, a large or multi-monitor display, and the simulation controls mentioned earlier. A reliable internet connection is important for installing regular updates and connecting with other enthusiasts online.
In addition, consider having a comfortable chair, a safe desk space, and well-organized cables for ease of use. An environment that feels like a real cockpit can give a boost to both your enjoyment and learning curve as you practice flying. 👉 You might also like this guide on the best software tools for new sim pilots — it breaks everything down in more detail.
For extra help getting started, check out this home flight simulator setup guide from FlightSim Association — it’s a great resource as you plan your build.
Setting Up Microsoft Flight Simulator
Many users start with Microsoft Flight Simulator due to its accessible interface and realistic graphics. If you choose Microsoft Flight Simulator as your primary software, there are certain hardware recommendations that you should consider. I suggest ensuring that your computer matches or exceeds the minimum requirements provided by the software. You can find the official system requirements for Microsoft Flight Simulator here.
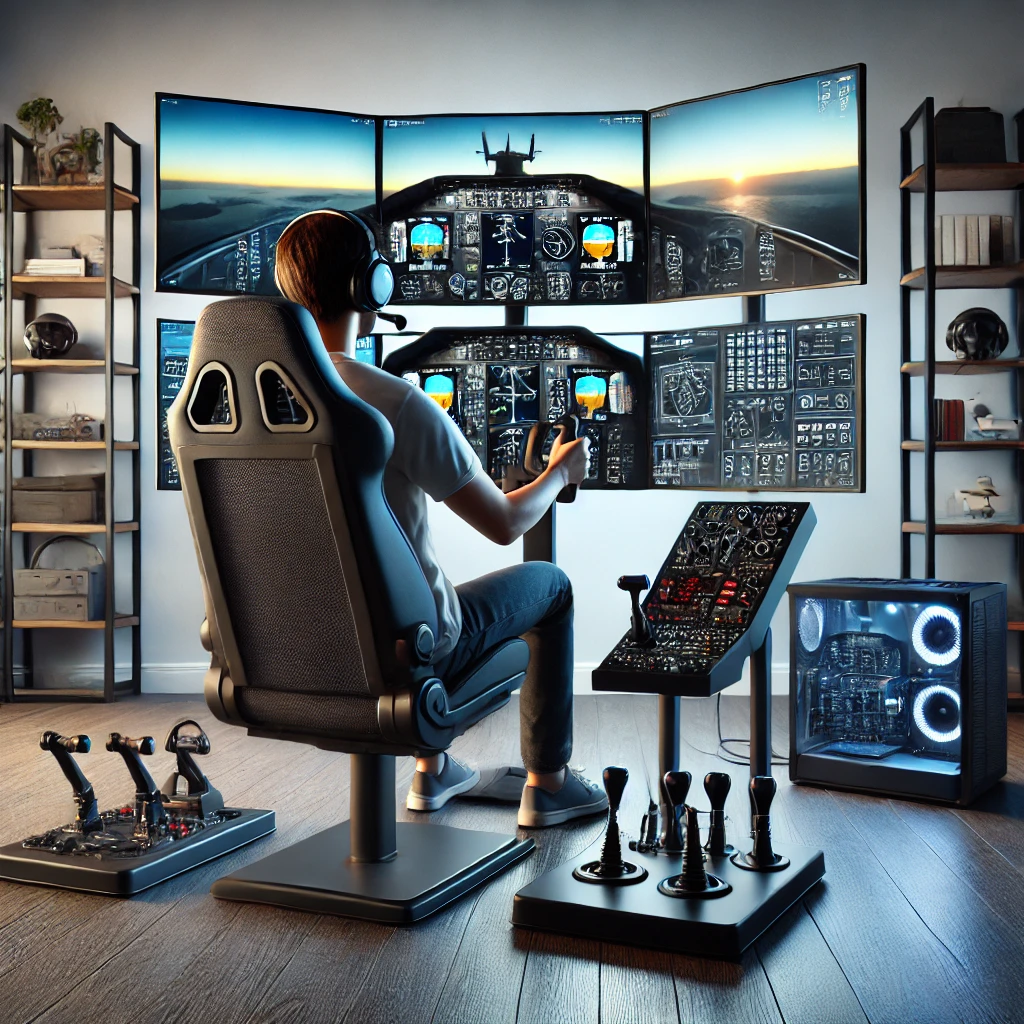
The typical setup for Microsoft Flight Simulator includes a powerful processor, a robust graphics card, ample storage space, and at least 16GB of RAM. This ensures you can run complex scenarios and large maps smoothly. Additionally, a dedicated flight stick, throttle, and rudder pedals are really important for a refined experience. Some users opt for a full multi-monitor display to maximize immersion, allowing multiple cockpit views and system readouts.
Microsoft Flight Simulator has built-in tutorials and assistance settings to help beginners understand the basics, making it a good starting point for those who may not have extensive experience with simulation platforms.
Choosing the Best Flight Simulator for Beginners
Many newcomers to flight simulation ask, “What is the best flight sim for beginners?” Through my experiences, I’ve found that Microsoft Flight Simulator tends to be a popular choice. Its accessible user interface, realistic environments, and gradual learning curve have helped many users transition from beginner to a confident pilot. Other options like X-Plane or Aerofly FS might offer different experiences. For many aviation enthusiasts, however, Microsoft Flight Simulator provides a well-balanced start. The customizable settings allow you to progress at a comfortable pace without feeling overwhelmed.
Can a Noob Play Flight Simulator?
The answer is yes. You do not need extensive prior knowledge or complicated setups to start playing flight simulators. I have seen many beginners make significant progress by starting with default configurations and simple tutorials. These programs are designed with newcomers in mind to ensure that everyone, regardless of prior experience, can enjoy flying virtually.
With a basic set of controls, a beginner can start learning about aircraft operation, navigation, and even weather behaviors. Over time, as skills improve, you might choose to fine-tune settings or upgrade your equipment to push the experience further.
Things to Consider Before Investing in Your Flight Simulator Setup
Investing in a flight simulator setup requires careful planning to ensure you purchase only what you truly need. I advise considering a few key points before making any major investments:
- Budget: Determine how much you are willing to spend. It is possible to build a basic simulator setup without stretching your finances too far. Start simple, then expand your gear gradually as you become more engaged with the simulation.
- Space and Setup: Find a dedicated area in your home where you can assemble your flight simulator undisturbed. Having a dedicated space helps you stay focused and also keeps your gear organized and protected.
- Component Compatibility: Check that the peripherals and computer hardware you choose are compatible with the software you plan to use, such as Microsoft Flight Simulator.
- Future Upgrades: Look for gear that offers room for future improvements. For example, a basic flight stick can later be replaced with a more advanced control panel as your skills develop.
Considering these factors upfront can help you avoid frustrations down the road and ensures that your setup can grow along with your advancing skills.
Advanced Tips and Tricks for Simulation Enthusiasts
After you have set up the basics, I often experiment with advanced customization options to step up my simulation experience. Adjusting both software and hardware configurations can yield significant improvements. Here are a few tips that might prove useful:
Fine-Tune Your Controls: Take some time to calibrate your flight stick and other peripherals. Fine-tuning improves responsiveness and can make flights feel more realistic.
Customize Software Settings: Check out the configuration options in your simulator software. Adjust graphics settings, weather simulation details, and control sensitivity to match your personal comfort level.
Add Realistic Scenery and Addons: Over time, adding overlays, high-resolution textures, and real-world scenery packs can step up the realism of your simulator. Although some of these features come at an extra cost, they often give a boost to the overall experience.
Participate in Online Communities: Joining forums or social media groups lets you share experiences and get tips from other enthusiasts. Many users contribute detailed tutorials, troubleshooting guides, and advice on hardware improvements.
These pointers can help you tailor your simulation experience and progressively enjoy an ever-more immersive setup. Stepping up your simulation gradually ensures that you stay comfortable with upgrades and changes as your skills improve.
👉 Want to fine-tune realism even more? Here’s how to understand aerodynamics in simulators.
The Basics: What Setup Do You Need for Microsoft Flight Simulator?
When it comes to Microsoft Flight Simulator, I have found that a well-rounded setup is key to making the most of its capabilities. The recommended setup includes a robust PC along with several peripheral devices to keep the experience smooth and engaging.
A computer with a multi-core processor, a high-end graphics card, and sufficient memory is the backbone of your simulator. The software often recommends specific hardware specifications to achieve smooth performance. Understanding these technical aspects helps you choose the right equipment without overspending.
For the peripherals, a quality joystick or yoke adds significantly to the feeling of control. In addition, a throttle quadrant and rudder pedals provide a more complete cockpit simulation. A multi-monitor setup can display different views simultaneously, which is very helpful for navigation, instrument panels, and environmental views. Some enthusiasts even set up a dedicated control panel that includes extra screens for communication, flight data, and other essential instruments.
This all-in-one setup is adaptable whether you are completely new to flight simulation or have some experience under your belt. It works well for a variety of scenarios, ranging from training purposes to casual virtual flying.
Extra Tips and Community Insights
Over time, I’ve picked up a handful of helpful tips that have made my simulator setup smoother and more fun to use. The flight simulation community is large and welcoming, and there is no shortage of advice or support available online. It is a good idea to explore community forums, watch video tutorials, and even check in with local simulation clubs if you have the opportunity.
One particularly valuable tip is to keep experimenting with software modifications. Many simulation enthusiasts share custom settings and control profiles that you can download and try out. This experimentation not only helps you get the most out of your hardware but also lets you discover unique methods to tackle common challenges faced during simulation flights.
In addition, investing time in understanding the finer details of aircraft systems—such as instrument behavior and environmental effects—can significantly improve your skills. Spending time reading up on aviation procedures and flight management practices can also make your virtual experience more rewarding. It is beneficial to set aside time each week to review new software updates, troubleshoot any issues, and learn from others who have mastered advanced configurations.
Moreover, many users have found that organizing regular online meetups or virtual fly-ins can add a social dimension to what might otherwise be an isolated experience. These gatherings give you a chance to swap ideas, share upgrade experiences, and even participate in friendly competitions. The synergy in these groups often leads to innovative approaches to simulation challenges, ultimately helping everyone involved to refine their skills further.
Finally, never underestimate the value of detailed record keeping. Maintaining a log of your setup changes, calibration tweaks, and even your flight performance can help you measure your progress over time. This methodical approach not only builds confidence but also ensures that you have a reference guide to fall back on when making future upgrades.
Frequently Asked Questions
This section answers some common queries that often arise when you start your flight simulator adventure.
Question: What do I need to set up a flight simulator at home?
Answer: You need a high-performance computer, a monitor or multiple screens, and flight controls such as a joystick, throttle, and rudder pedals, along with a comfortable space and a reliable internet connection.
Question: What setup do you need for Microsoft Flight Simulator?
Answer: A powerful computer with a high-end processor, graphics card, and sufficient memory is essential. Accessories such as a flight stick, throttle quadrant, and rudder pedals also help. A multi-monitor setup can step up the experience but remains optional.
Question: What is the best flight sim for beginners?
Answer: Many beginners find Microsoft Flight Simulator a good choice because it offers an accessible interface and helpful tutorials. Its realistic graphics and manageable difficulty levels make learning enjoyable even for those with little to no experience.
Question: Can a noob play flight simulator?
Answer: Yes, even beginners can enjoy flight simulators. The software includes various difficulty levels and built-in training modes to help new users grasp the basics before gradually advancing to more complex scenarios.
Wrapping Up
Designing your own flight simulator setup can be a deeply fulfilling project. I believe that beginning with a clear plan and a solid understanding of the required components makes the process much smoother and more enjoyable. By choosing the right computer, selecting quality peripherals, and gradually incorporating advanced features, you can quickly move from a basic configuration to an elaborate simulation environment.
With a wealth of resources available online and communities ready to share advice, the adventure of building your custom flight simulator is both educational and fun. I encourage you to start with simple steps and gradually expand your setup as your skills improve. The sky is your limit when it comes to exploring virtual aviation. Each simulated flight is an opportunity to refine your skills and enjoy the intricacies of aircraft operation.
Remember to kick things off with enthusiasm and remain open to learning. Every tweak and adjustment you make brings you closer to a more realistic flying experience. Your custom flight simulator setup is not just about the hardware; it is also about the continuous learning and passion that fuel your adventures in the virtual skies.
Your blog on setting up a custom flight simulator was incredibly detailed and informative! I loved how you broke down each component, from hardware to peripherals, making it easier for beginners to understand. The tips on fine-tuning settings and joining online communities were particularly helpful, adding a personal touch to the guide. It’s impressive how flight simulation has evolved to offer such immersive experiences. One thing I’m curious about—how do budget-friendly setups compare to high-end ones in terms of realism and performance?
Hi Kavitha, Thanks again for the nice comment! I wanted to make the post easy to follow so beginners wouldn’t feel overwhelmed—there’s a lot of gear out there, and it can definitely be too much at first. That’s why it’s best to start with the basics and build up over time.
As for budget-friendly setups, they can still offer a great experience, especially for learning the fundamentals. While they might not match high-end gear in terms of realism and performance, even simple upgrades—like a decent flight yoke or rudder pedals—can make a noticeable difference.
Setting up a custom flight simulator seems like an exciting yet complex process, especially when balancing realism with budget and available space. One challenge I’ve often wondered about is choosing the right hardware – how do you determine the best balance between performance and affordability when selecting components like yokes, pedals, and multiple monitors? Also, when configuring software settings, do you have any recommendations for optimizing frame rates without sacrificing too much realism? Have you found any particular hardware combinations that offer the best experience without breaking the bank?
Hi Stavisa, thanks for the great question! These are common things many people wonder about when starting out, so I’m happy to share.
To start, a simple setup like a joystick and one monitor is more than enough—it keeps things affordable and still gives a solid experience.
For performance, I’ve tried running older versions of FMS with high graphics, and while the visuals were great, it did get laggy. Setting it to medium or just above is a good balance, especially on a mid-range PC. For higher settings, a stronger graphics card or gaming rig helps a lot.
As for hardware, a joystick like the Logitech Extreme 3D Pro is a great budget-friendly option. Later on, adding a yoke and throttle can really boost the realism without spending too much.